
RAW vs JPEG – Which Image Format is Better and Why
The topic of RAW vs JPEG image format is one of the never-ending debates in photography. Some photographers say shoot in RAW, while others say shoot in JPEG. What is the RAW format in digital photography and what are its advantages and disadvantages when compared to JPEG? Having a thorough understanding of file formats and their differences is essential for photographers in order to make the right choices when going through camera settings.
I remember my first time going through my camera options and reading the manual, wondering about what RAW does and why I should consider using it. JPEG is a no-brainer – it’s the default image format that is used in most smartphones and point-and-shoot cameras, so we know what to expect from it. But when I came across the RAW image format, I wanted to find out how it affects images immediately, as the word “raw” by itself sounded intriguing to me. So I went ahead and changed my camera settings to RAW and tried to take a picture. The first thing I noticed, was how small all of a sudden my memory card became. “Wait a second, how come the number of pictures went down from several thousand to less than 500?” is what went through my head. The image looked exactly the same on the LCD and yet it consumed more than three times more storage. Bummer. Then, I took the memory card and inserted it into my laptop. To my surprise, I couldn’t even see or open the darn thing! “Worthless”, I exclaimed, then changed my camera settings back to JPEG.
Sounds familiar? If you are in a similar situation, do not make the mistake of abandoning RAW as I once did and read on. You truly need to understand all the advantages and disadvantages of both formats before making this important decision, because you might be sorry that you didn’t later.
Table of Contents
A RAW image (also known as a “digital negative”) is an image file that contains unprocessed or minimally processed data from a digital camera’s sensor. Similar to raw food ingredients that need to be prepared and cooked before consumption, a RAW image also needs to be post-processed in software before it is ready to be printed, shared or shown on a display device. Unlike JPEG files that can be easily opened, viewed and printed by most image-viewing / editing programs, RAW is a proprietary format that is tied to a specific camera model. Therefore, in order for the software to be able to work with a RAW file, it must be compatible with the particular camera the RAW image was captured with. Post-processing RAW images can yield greater dynamic range (with better highlight and shadow recovery options), superior colors and in some cases can even provide more detail when compared to JPEG images.
RAW files typically consist of three main parts: the actual RAW data from the image sensor, a camera-processed full-size JPEG preview + thumbnail, and all relevant header and metadata information. For cameras to be able to display the recorded image on the rear LCD or on the electronic viewfinder, the camera-processed JPEG preview is used. The image header, as well as parts of the metadata are used for interpreting sensor image data by RAW conversion software, while other metadata information such as exposure settings, camera and lens model, date/time, etc. can be used for filtering, sorting and cataloging images.
JPEG is an image format that utilizes lossy compression for storing and displaying digital images. Thanks to its high compression efficiency, it is the most popular and the most adopted image format today, with most display devices and software having built-in capabilities to read and display JPEG images. Different levels of quality (typically in percentage) can be applied to compress JPEG images, which impacts the overall quality and the final size of the image. Lower quality conversion results in higher compression rates, smaller files and compression artifacts, while images saved with a higher quality setting will reduce the potential for compression artifacts at the cost of increased storage needs.
Let’s now move on to the most important question – should you be using RAW or JPEG for your photography?
For me, shooting in RAW far outweighs the advantages of using JPEG. Storage is cheap nowadays and the file size does not bother me, even for backups. Since I already spend a considerable amount of time taking pictures, I do not mind spending a little more time and effort working on them in the digital darkroom. True, if I was required to post-process every image one at a time, I would have certainly abandoned RAW altogether, because I wouldn’t have the time to go through tens of thousands of pictures. However, thanks to all the image culling, cataloging and post-processing software that lets me pick and choose what to edit, with the ability to go through images in batches, I do not have to worry about wasting time and only concentrate my efforts on images that matter.
On top of that, my time and storage considerations are relatively small issues when compared to the amazing ability to recover information from RAW photos. Like many other photographers, I have been in situations where I managed to take a badly exposed image or mess up my white balance on a photograph that was too important to discard, such as a photograph from a wedding or a paid corporate shoot. If I shot only in JPEG, I would not be able to do much to save the image. But thanks to RAW and its recovery potential, exposure and white balance errors are relatively easy to correct (as long as exposure errors are not too extreme). RAW can make a huge difference in such situations, especially when photographing rare, special moments that cannot be reproduced ever again.
How much difference is there when trying to recover data from a RAW image compared to JPEG? Let’s take a look at the first example:
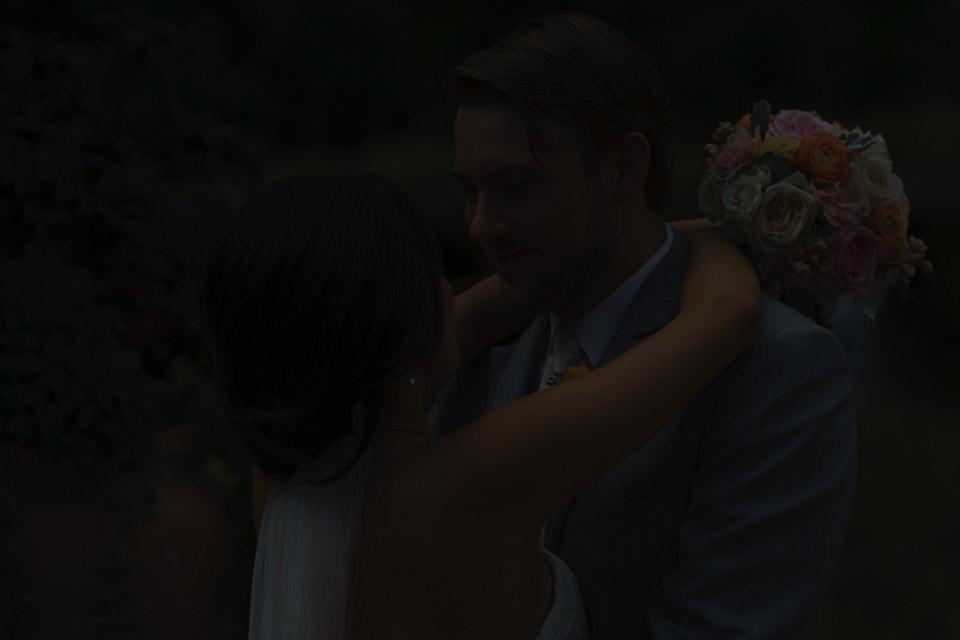
My camera shutter speed was still from the previous location where it was much brighter and I didn’t notice the issue until after the fact. Gladly, I shot in RAW and I was able to almost fully recover the details that otherwise would have been lost. It was a first look and the best image of the groom’s face, which I did not want to lose. Take a look at below image on the left, which was recovered by 5 stops from the RAW file, while the image on the right was recovered the same way from a JPEG image:

As you can see, the difference between the two is very noticeable and significant. Recovering the image by 5 stops in Lightroom was a bit extreme in this case and I certainly ended up with more noise in the resulting image, but it was still perfectly usable. Now if I had shot the same image in JPEG and underexposed it by that much, there would have been no way to recover all that data, and I would not have been able to deliver this image to my clients.
It is hard to believe that such recovery is possible with a RAW image until you try it yourself. Go ahead and set your camera to RAW + JPEG, then underexpose an image by a few stops and see how much more recovery potential you have with the RAW image vs JPEG. You will be amazed by what you see and experience a similar result as above.
Now let’s take a look at another underexposed image, which I took at night using a very long exposure of 262 seconds. My camera battery was about to run out, so I stopped the exposure to swap the battery out and start another one:
Unfortunately, my next exposure did not work out at all, because it got much brighter at dawn and the stars disappeared from the sky. I thought I would not be able to recover the image, but after dialing +4.5 on the exposure slider in Lightroom, I was able to bring out all the details of the image, which was incredible! I then adjusted a few settings of the image such as Highlights, Shadows, Whites and Contrast, and here is what I was able to get as a result:
Now if you are wondering what I would have been able to do with the image if I had shot it in JPEG, here is the result:
Yikes! I wasn’t able to make both images look remotely similar, even after dialing +5 exposure and -100 highlights for the JPEG image. As you can see, the image is completely unusable!
The next example involves an image that has an overexposed sky. Here is the original RAW image without any post-processing applied to it:
The image on the left below is the RAW image that had the sky recovered and other adjustments made to the image using Adobe Photoshop Lightroom. The image on the right went through exactly the same post-processing steps, except the original was a JPEG:
As you can see, the source JPEG image contained almost no data to be able to recover highlights in the sky, which is why it looks gray. Much of the cloud on the top right, as well as all the clouds on the left, were also overexposed and I could not recover any of those highlights. In addition to all this, if you look closely, you will also find subtle differences in other areas of the image where changes in white balance did not go in favor of the JPEG image.
If you are wondering how much more dynamic range one can pull out of a RAW file vs JPEG, take a look at my article that compares dynamic range between Nikon and Canon DSLRs. I gave two examples in that article that show what a 14-bit RAW file can do compared to a JPEG file when recovered in post-processing. Take a look at the below images (Left: RAW +5 Stop Recovery, Right: JPEG +5 Stop Recovery):
That’s a drastic difference in the ability to recover colors and details!
Anyway, here is my conclusion on the RAW vs JPEG debate: if you are serious about your photography, you should always shoot in RAW format. If you are just taking pictures of your family for fun, and you are OK with not taking advantage of the capabilities of your camera, then, by all means, shoot in JPEG.
Please let me know if you have any questions or feedback in the comments section below.