
Perfect your pet portraits by adding layer effects in Photoshop
By James Paterson, PhotoPlus 05 May 2021
Add a splash to your pet portraits with Photoshop CC by combining images to add effects
Watch video: Perfect your pet portraits with layers in Photoshop
A shoot rarely goes exactly to plan, especially when working with children or animals. While photographing the dog here, our idea was to create a shot with water drops flying out from the dog’s head at all angles. It proved tricky to get the dog to play ball, though. And even when we managed to get a usable shot, it didn’t have the scattering of water drops that we'd envisaged.
However, we did have other frames from the shoot in which the dog wasn’t right, but the water drops were plentiful. As such, we could piece together the drops and the dog to craft the shot that we wanted. This is often the case with Photoshop techniques; it’s about augmenting the in-camera results to improve the image, and doing so in such a way that looks natural.
When we have several similar shots of the same thing, all taken under the same conditions, it often makes sense to piece together the best bits from each. This kind of subtle compositing is easier than it might seem – especially if, like here, the subject is photographed against a plain backdrop (or if a tripod is used, to keep the various frames in alignment).
RECOMMENDED VIDEOS FOR YOU...
video playingAdd a glowing lightsaber in Photoshop CC
Apply watercolour effects in Photoshop CC
29/10/19Apply watercolour effects in Photoshop CC
Adding bokeh to portraits in Photoshop...
29/10/19Adding bokeh to portraits in Photoshop Elements
Adding creative effects in camera
29/10/19Adding creative effects in camera
Combining text and portraiture in...
29/10/19Combining text and portraiture in Photoshop CC
Get the infrared look in Photoshop CC
24/03/20Get the infrared look in Photoshop CC
We can simply use the Lighten Blend Mode so that the droplets show through but the original dark backdrop does not. Then fine-tune the blend with a Curves adjustment, and if necessary use a layer mask to control what is visible or hidden. These are essential layer skills that will prove useful for all kinds of projects…
Today's best Adobe Creative Cloud deals
Adobe
Creative Cloud Photography
$9.99/mth
VIEW DEAL
at Adobe
Adobe
Creative Cloud Single App
$20.99/mth
VIEW DEAL
at Adobe
Adobe
Creative Cloud All Apps
$52.99/mth
VIEW DEAL
at Adobe
01 Select the splash
Photoshop dog splash
(Image credit: James Paterson)
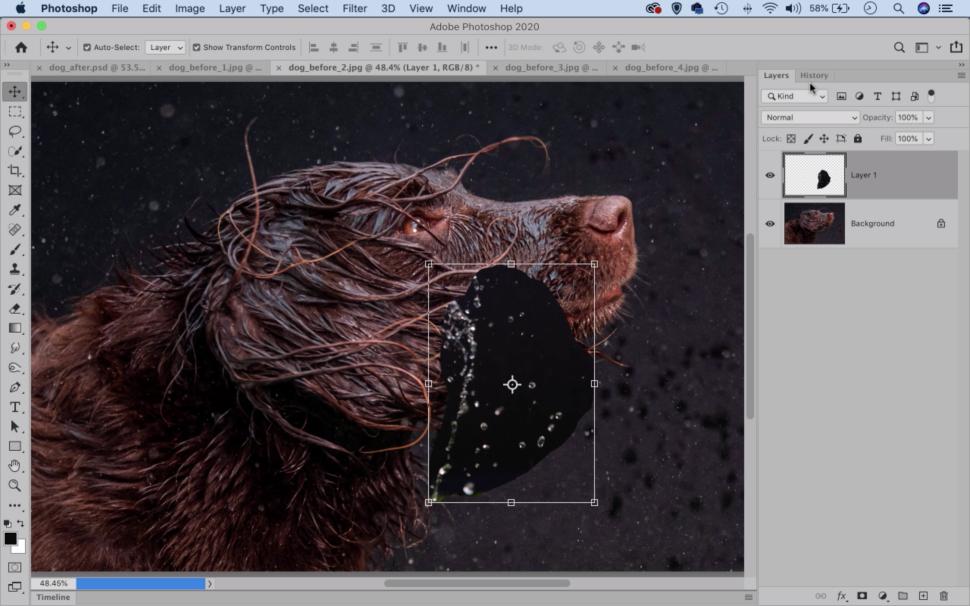
Open the four start images (download here) into Photoshop CC then go to image three. Grab the Lasso tool from the toolbar and drag it to make a selection over part of the splash in the background. Next grab the Move tool. Drag the selected area up to the tab of image two, then down into the image to copy the selection over.
02 Copy and blend
Photoshop dog splash
(Image credit: James Paterson)
Bring up the Layers panel (Window > Layers), then go to the Blend Mode dropdown at the top and change it from Normal to Lighten. Now only the pixels that are lighter than those on the layer below will show through, so the splashed appear, but the dark background behind is invisible.
03 Boost the highlights
Photoshop dog splash
(Image credit: James Paterson)
We can enhance the splashes with a Curves Adjustment. Hit Cmd/Ctrl + M then drag the top part of the Curves line upwards to lighten the layer. Then pin the lower part of the curve line downwards by placing another point, this darkens the shadow tones, so the original backdrop stays hidden.
04 Mask the edges
Photoshop dog splash
(Image credit: James Paterson)
Bring in more splashes and drops in the same way. This time we’ve use image one, but the edges of the selection look unnaturally hard. In this case, a layer mask helps to soften this. Click the Add Mask icon in the Layers panel, then use a soft-edged brush tip and paint black over the image to soften the edges.
05 Build it up
Photoshop dog splash
(Image credit: James Paterson)
We can re-use layers and position them around the frame to build up the effect. Using the Move tool, simply hold Alt and drag a layer to make a quick copy. Try rotating layers to mix things up. Check ‘Show Transform Controls’ in the move tool options then drag the bounding box to rotate the layer.
06 Enhance the tones
Photoshop dog splash
(Image credit: James Paterson)
The Camera Raw filter is ideal for final tonal tweaks. Highlight the top layer and hit Cmd/Ctrl + Shift + Alt + E to merge a copy of everything, then go to Filter > Camera Raw Filter. Choose a Profile in the browser to the right and use the tonal sliders in the Basic Panel to add clarity and contrast.