
Make your own Lightsaber in Photoshop to celebrate Star Wars Day!
By N-Photo 04 May 2021
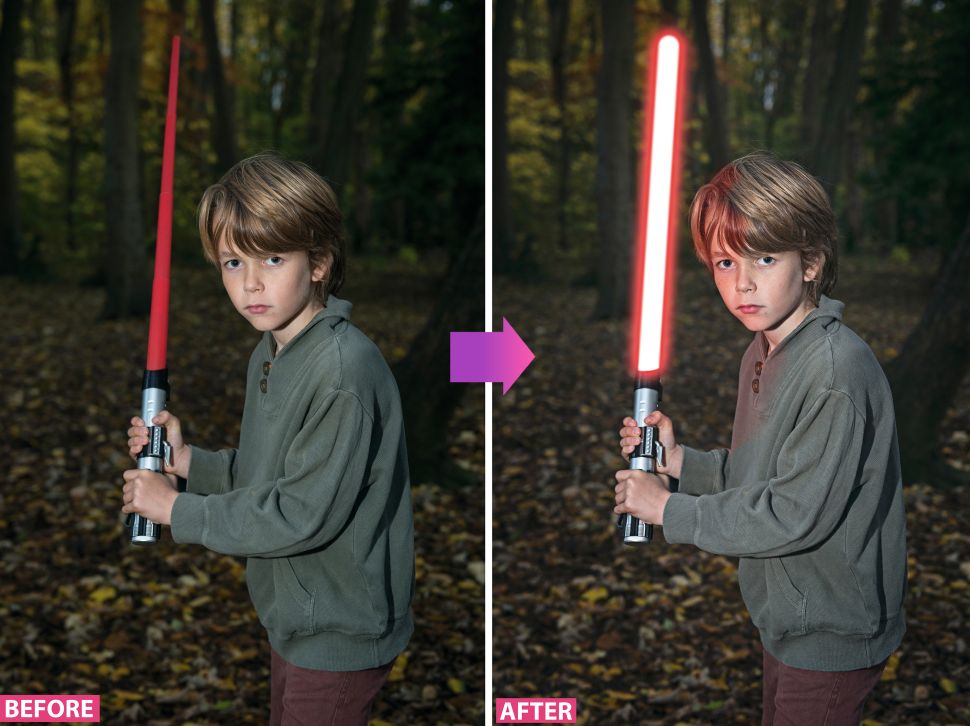
How to make your own Lightsaber in Photoshop – or one for your kids! – and become a Jedi Master
Watch video: Make your own Lightsaber in Photoshop for Star Wars Day!
MORE PHOTO EDITING GUIDES
Tips and tutorials
• How to download Photoshop
• 100 Photoshop tips!
• 15 top Photoshop fixes
• More Photoshop tutorials
• Photoshop Elements tutorials
Free Photoshop stuff
• 55 free Photoshop brushes
• 63 free Photoshop templates
• 52 free Photoshop plug ins
• 63 free Photoshop actions
• Free textures for Photoshop
• Free frames and borders
It's the Fourth of May, better known as Star Wars Day. And that means you have to make a difficult choice: will you choose the dark side or the light?
With this quick tutorial, you can make your own Lightsaber in Photoshop and choose either! Obviously, this is a great project to get the kids involved in.
The first step is to take a photo of someone mid-pose with a toy Lightsaber – or, indeed, any other sword, cooking utensil or crazy object if you feel like having fun. Maybe you'd rather have a Jedi that wields a laser umbrella instead of a laser sword!
ADOBE TRIAL DOWNLOADS
Don't have Photoshop? You can get a 7-day Adobe Creative Cloud trial to try Photoshop and other Adobe software for free.
• Download Photoshop
• Download Lightroom
• Download Premiere Pro
Next, you’ll learn how to add the perfect glow effect with the Brush tool and a few layers and filters in Photoshop. You see, it’s not just the weapon that we’re going to recreate here; to make the effect more realistic, you’ll need to think about how the light from the imaginary weapon will react with the rest of the scene.
Having an idea of how the light will contour the weapon holder’s face and hands is important. To get this spot-on, try holding a light in your hands while looking in the mirror – this way, you’ll be able to see where the light falls.
With some simple planning you can create a weapon fit for Luke, Obi-Wan, Rey or even Kylo Ren. So, let’s grab our Photoshop wand and make some movie magic…
Today's best Adobe Creative Cloud deals
Adobe
Creative Cloud Photography
$9.99/mth
VIEW DEAL
at Adobe
Adobe
Creative Cloud Single App
$20.99/mth
VIEW DEAL
at Adobe
Adobe
Creative Cloud All Apps
$52.99/mth
VIEW DEAL
at Adobe
Make your own Lightsaber in Photoshop
01 Paint your 'saber
Make a new layer (Cmd/Ctrl+Shift+N). Pick the Brush tool (B), go to Window>Brush and make Spacing 1% for a solid line as you paint. Now set a white foreground color. Click on the handle, hold Shift and click the end of the Lightsaber. Use a mask to remove the glow on the handle.
02 Let it glow
Duplicate the new layer, right-click on the mask and then click Apply Layer Mask. Go to Filter>Blur>Gaussian Blur and set 75 pixels. Duplicate this layer several times to boost the glow. Now drag the original layer (with the Lightsaber in) to the top of the Layers palette.
03 Choose the light (or the dark)
Click the topmost glow layer, Shift-click the bottom one, and press Cmd/Ctrl+G. With the Group selected, add a Hue/Saturation adjustment layer, tick Colorize, lower the Lightness and boost Saturation. Alt-click with the cursor halfway between this layer and the group.
04 Light the face
Make a new layer. Choose the Brush tool, set the glow color, right-click the image and set brush Hardness to 20%. Set Soft Light blending mode and paint in the glow. Mask out any bits that spill onto the scenery. Blur the light with Filter>Blur>Gaussian Blur at 30 pixels.
05 Sharpen it up
To get a gritty, cinematic look, we’re going to use the High Pass filter to accentuate the edges in the shot. Use Cmd/Ctrl+Shift+N to create a new layer, then Cmd/Ctrl+Alt+Shift+E to merge visible layers. Finally go to Filter>Other>High pass and choose about 80 pixels.
06 Tweak the colors
Finally, we’ll color balance the image a little. Make a new adjustment layer and choose Color Balance. Click on Tone and give the shadows a positive boost on the blue and cyan channels, and turn the highlights orange by boosting the yellow and red channels.
07 Add a vignette
First, choose the Elliptical Marquee tool (left-click and hold on the Marquee tool to see this option). Drag a circle around your subject, right-click and select Refine Edge. Set Feather to 300 pixels and click OK. Use Cmd/Ctrl+ Shift+ I to invert the selection, pick the Paint Bucket tool (G) with black as the foreground color (D) and click in the selection. Reduce the layer opacity to 30%.