
Lockdown projects: shoot liquid color abstracts from the comfort of home
By Niamh Cottle 19 days ago
Create and capture abstract masterpieces using everyday items that you will have in your kitchen
Spending more time at home has given me the opportunity to use everyday objects to create interesting and unknown images. I particularly wanted to focus on how I could experiment creatively with color, and started to ponder some sources of inspiration.
After some research, I found what I was looking for in a collection of Jackson Pollock work. This led me to envisage the kinds of colors that I could produce by mixing together items in my kitchen – water, oil and food coloring – and then capture the results with my camera.
These materials can be used in simple ways to create intriguing images, but you don’t have to stop there – you can always experiment further with other household items.
I’ll also show you how to apply easy editing techniques to tease out the best results from your abstract color captures; some minimal tweaks to brightness and contrast and the Tone Curve will make a big difference.
This tutorial will allow you to have some fun and be expressive; it’s a great way to boost your creativity and hone your artistic approaches to image-making.
DCam 240 create colour abstracts image 2
(Image credit: Niamh Cottle/Future)
Create liquid color abstracts – what you’ll need
Camera with standard focal range lens
Tripod
Clear or white sandwich box or jar
Food coloring
Vegetable oil
Water
Small bowl
Syringe
Cocktail sticks
White towel
Time required: Two hours
Get set up for creating color abstracts
DCam 240 create colour abstracts image 3
(Image credit: Niamh Cottle/Future)
01 Get your container ready
Find somewhere with continuous natural light, for example your largest windows at home. Lay a white towel on the surface you are going to use, in case of any spillages.
Add water to your container, filling it up about halfway. I used two containers to get two different results from dropping in the color.
I used an old sandwich box container made from clear white plastic; this would give me a clear background and make it easier to pick out the color when photographing.
I also used a clip-top jar to capture the motion of the color dripping through the oil and water.
DCam 240 create colour abstracts image 4
(Image credit: Niamh Cottle/Future)
02 Camera setup
Place your camera on a tripod to free up your hands for multi-tasking: one hand will add the color, the other will release the shutter.
My Manfrotto Befree GT XPro tripod allows me to move the head into a landscape position, so I can be over the top of the subject shooting downwards. You can easily just move the tub into the correct position so you can see the water.
I used an 18-55mm lens on my APS-C sensor DSLR (equivalent to 29mm-88mm in full-frame terms), which allowed me to zoom in on certain areas and zoom out to show the overall reaction.
DCam 240 create colour abstracts image 5
(Image credit: Niamh Cottle/Future)
03 Prepare the container
Add a small amount of vegetable oil to a small bowl. Use a syringe to draw up the oil, then gently squirt the oil onto the water – go slowly, otherwise it will splatter everywhere.
Once it’s squirted on the water, you will see circles form on top. Let the circles settle; you can gently push some circles together with a cocktail stick to enhance the surface area. This will help, as it will make it easier just to focus on one area.
DCam 240 create colour abstracts image 6
(Image credit: Niamh Cottle/Future)
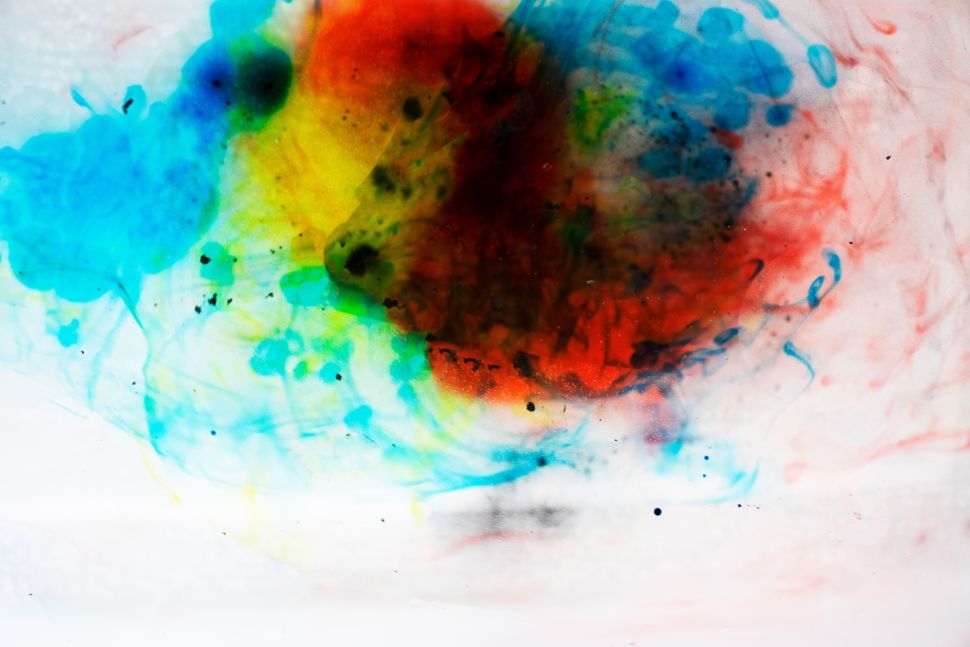
04 Add the color
Make sure you have a range of colors to pick from and cocktail sticks to hand so it will be easier to switch between colors. I started off by first dipping my cocktail stick into one color, just covering the tip of the cocktail stick.
Then place it slowly into the surface of the oil and dip it in and out. Slowly you will start to see a reaction with the color.
DCam 240 create colour abstracts image 7
(Image credit: Niamh Cottle/Future)
05 Camera settings
Make sure your camera is ready with the right settings. I started with a shutter speed of 0.5 sec at f/5.6, ISO 100.
This allowed me to show the colors through the water. From here, I only changed the shutter speed depending on whether I wanted more light through the image or if the light was too overpowering.
DCam 240 create colour abstracts image 8
(Image credit: Niamh Cottle/Future)
06 Time to experiment
Now it’s all about trial and error. Add more colors to be more experimental and create reactions between the colors; you will also be able to see the colors react together.
But don’t add too many colors, otherwise it will overpower the mixture and go black.
Today's best Manfrotto Befree GT XPRO deals
Manfrotto Befree GT XPRO...
Amazon
Prime
$294.88
VIEW DEAL
Manfrotto Befree GT XPRO...
Amazon
Prime
$449.88
VIEW DEAL
We check over 130 million products every day for the best prices
How to edit your abstract masterpieces
DCam 240 create colour abstracts image 9
(Image credit: Niamh Cottle/Future)
01 Increase your brightness and contrast
When editing the image, focus on getting the colors bright and capturing the detail of the reaction through the image.
You can see the dent of the sandwich box in the original image. Turning Brightness to around 85 can make the background white and enhance the color.
Moving Contrast to around 83 will enhance shadows in the shapes that are created by colors reacting to the oil.
DCam 240 create colour abstracts image 10
(Image credit: Niamh Cottle/Future)
02 Take it further with Curves
To enhance the image even further, use the Tone Curve to enhance the detail. I didn’t move the output too much, otherwise it would overpower the color; you only need to move it up a small amount.
Setting the input at 98 created the depth of color and you can see the different tints of color. You end up with this abstraction of color; it’s a mystery to the viewer, as they will question how you created this image.
Every image you make will be unique, as there will be different reactions every time.