
How to dodge and burn in Photoshop for brilliant black and white edits
By James Paterson, PhotoPlus 7 days ago
Learn how to dodge and burn in Photoshop, along with other tonal tricks to boost your photographs
Watch video: How to dodge and burn in Photoshop CC
The technique of selective lightening and darkening has been central to photography for over a century. In the days of film, areas of a print could be shielded from the light of an enlarger, or ‘dodged’. Conversely, the light could be focused onto smaller areas to ‘burn’ them in.
Photoshop makes the technique easier with the dedicated Dodge and Burn tools. The Dodge tool enables you paint to lighten areas, while the Burn tool darkens them. There are a few settings to master if you want to get the most out of these tools, so we’ll run through those.
However, the Dodge and Burn tools aren’t the only features on offer in Photoshop CC for selective lightening or darkening. Most of us begin editing our photos in a Raw processor, like Photoshop’s Camera Raw, or the near-identical tools in Lightroom’s Develop Module. We’ll begin here by using the Adjustment Brush in Lightroom, then continue the adjustments in Photoshop with the Dodge and Burn tools.
A viewer’s eye is naturally (and subconsciously) drawn to the lighter parts of an image first, while darker areas are less scrutinized. This becomes even more important with black-and-white photos, which offer greater headroom for these kinds of adjustments.
With the dodge and burn controls we can subtly boost parts of our image, while drawing attention away from other areas. We can lift important details, hide distractions, emphasize textures and gently shift the balance of our photograph.
Today's best Adobe Creative Cloud deals
Adobe
Creative Cloud Photography
$9.99/mth
VIEW DEAL
at Adobe
Adobe
Creative Cloud Single App
$20.99/mth
VIEW DEAL
at Adobe
Adobe
Creative Cloud All Apps
$52.99/mth
VIEW DEAL
at Adobe
01 Convert to mono
Dodge and Burn Tutorial
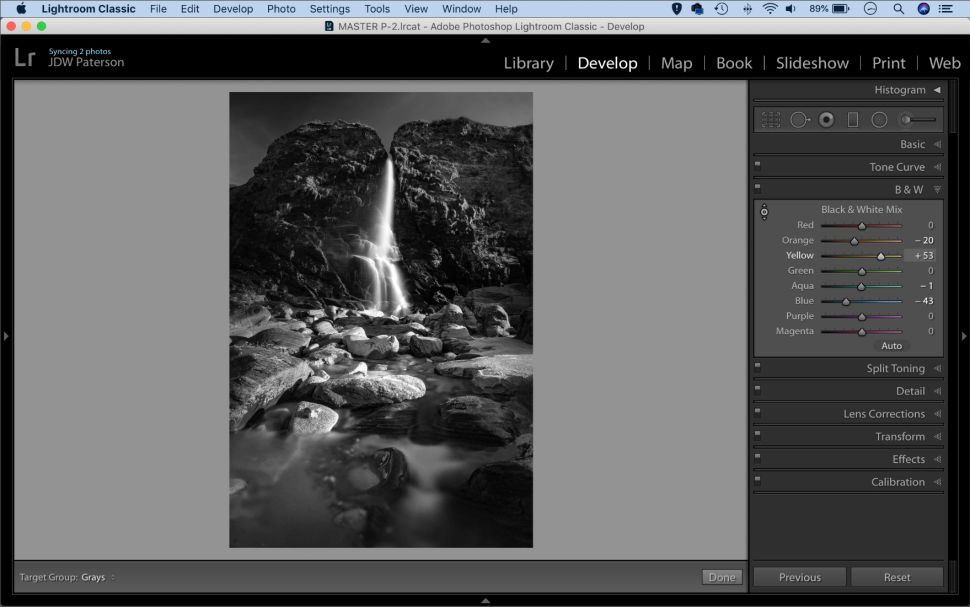
(Image credit: James Paterson)
When converting to mono we can control the brightness of colors, which gives us a head start with adjustments. After importing into Lightroom, go to the Develop Module and click ‘Black and White’. Use this panel to lift the yellows and darken the blues.
02 Lighten the waterfall
Dodge and Burn Tutorial
(Image credit: James Paterson)
Grab the Adjustment Brush from the Lightroom toolbar. Double-click ‘Effect’ to reset any previous settings, then dial in +1 Exposure. Paint over the waterfall and the water to lighten them. We can also crisp up the details by increasing Clarity as shown.
03 Open in Photoshop
Dodge and Burn Tutorial
(Image credit: James Paterson)
Right-click the image and choose Edit in > Edit in Adobe Photoshop. Once open, hit Cmd/Ctrl + J to duplicate the background layer, so we can work on a copy of the original. Get the Burn tool, go to the tool options and set Exposure 10%, Range: Midtones.
04 Darken the edges
Dodge and Burn Tutorial
(Image credit: James Paterson)
Using a soft-edged brush tip, paint around the edges to subtly darken them, creating a vignette that draws the eye to the details in the centre of the shot and away from the edges. Next, set Range: Highlights and paint over the brightest rocks to darken them.
05 Lift the water
Dodge and Burn Tutorial
(Image credit: James Paterson)
Set the Range to Shadows, then paint over the crevices in the rocks to darken them, emphasizing the textures. Next, switch to the Dodge tool and set Range: Highlights, Exposure 10%. Paint to lift the ridges in the rocks, and to add subtle bright streaks in the water.
06 Add extra punch
Dodge and Burn Tutorial
(Image credit: James Paterson)
Keep dodging and burning as you see fit – you can hold Alt while using either tool to switch to the other. Finally, we can add extra punch. Click the Create Adjustment Layer icon in the Layers panel and choose Curves, then plot a gentle S-shaped curve line.